
Editorial photography is defined as the practice of creating styled, narrative-driven images that support and enhance written content rather than directly sell a product. Unlike commercial work, editorial photography conveys mood, context, and emotion through every frame. The best editorial photography tips address the full process: from decoding a brief and building mood boards, to directing models, selecting gear, and curating a portfolio that wins clients. This guide covers each stage with the specificity that separates working editorial photographers from those still guessing.
1. Essential editorial photography tips start with the brief
The editorial brief is the single most important document on any shoot. Every brief defines the who, what, where, and why of the story, and your job is to translate those words into visual decisions before you ever pick up a camera. Treat it as a storytelling roadmap, not a checklist of deliverables.
Read the brief at least twice. On the first pass, note the narrative. On the second, identify every technical implication: lighting direction, color palette, wardrobe tone, and location type. A brief describing “raw, urban grit” calls for hard directional light and desaturated tones. A brief describing “sun-drenched summer freedom” calls for golden-hour natural light and warm, open compositions.
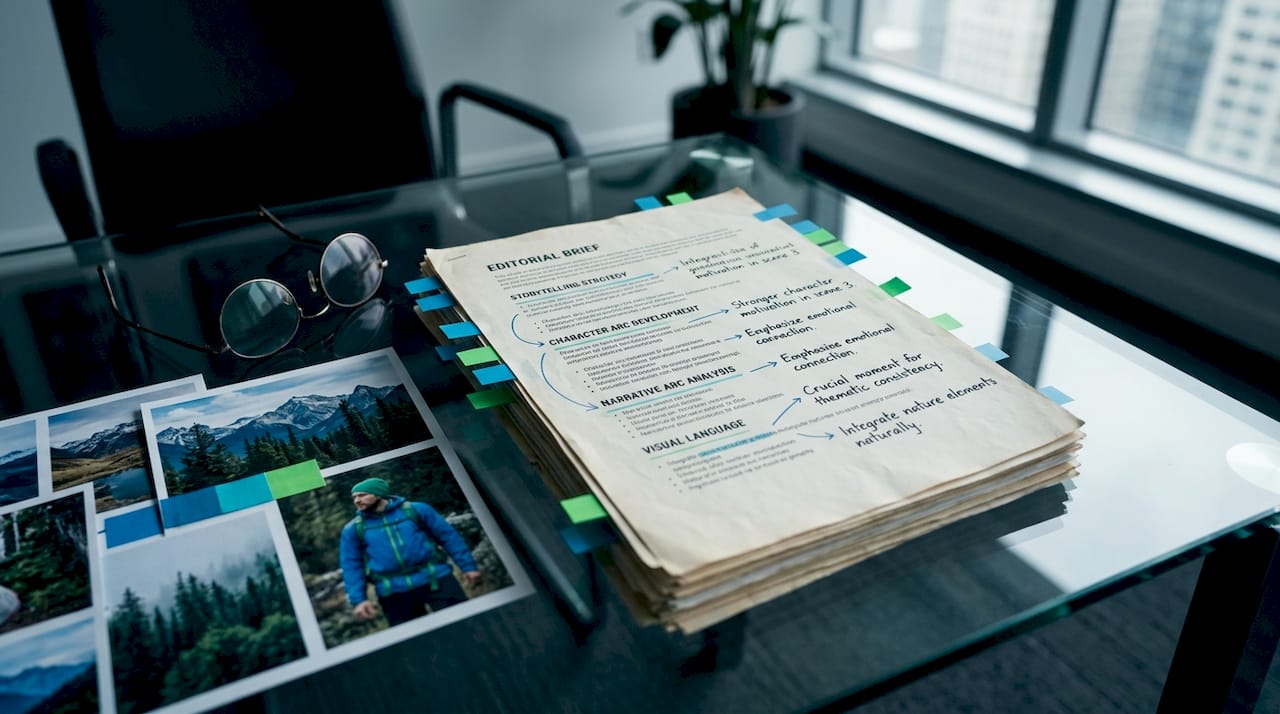
Pro Tip: Annotate your brief with specific visual references before your first team meeting. Arriving with concrete examples cuts alignment time in half and positions you as the creative authority on set.
2. How to build a mood board that actually drives decisions
A mood board is not a Pinterest collection. It is a visual translation layer that converts the brief’s language into lighting direction, color temperature, posing energy, and styling tone. Every image on your mood board should answer a specific technical question.
Organize your board into four zones: lighting references, color palette, wardrobe and styling, and composition framing. Share it with your creative director, stylist, hair and makeup team, and any models before the shoot. When everyone references the same visual language, on-set decisions happen faster and with less friction.
- Pull lighting references that show the exact quality of light you plan to recreate, not just the mood
- Include at least two composition examples that show how text overlay space will work in the final layout
- Add one “anti-reference” image showing what the shoot should not look like, which sharpens team alignment faster than any written note
Styling elements including wardrobe, color, and texture communicate context and emotion before a single caption is read. This means your mood board must address styling with the same rigor as lighting.
3. Gear selection and lighting techniques for editorial shoots
Gear choices in editorial photography are storytelling decisions. A 35mm prime on a full-frame Canon EOS R5 produces a different narrative intimacy than a 70-200mm telephoto. Macro lenses work for detail-driven lifestyle spreads. Wide primes suit environmental portraits where location is part of the story.
| Lighting setup | Best for | Key modifier |
|---|---|---|
| Softbox with key and fill | Studio fashion and portrait | Large octabox, 5-foot |
| Bare strobe with gel | Cinematic, moody editorial | CTO or CTB gel |
| Natural window light | Lifestyle and intimate portrait | White reflector card |
| Portable LED panel | On-location, run-and-gun | Diffusion sock |
Gelling flash to match ambient temperature prevents mismatched color casts and produces cohesive, publication-ready images. This is one of the most overlooked lighting techniques among photographers moving from commercial to editorial work. A CTO gel on your strobe, matched to the warm tungsten of a practical lamp in the background, creates a unified scene that reads as intentional rather than accidental.
Pro Tip: Pack a gel kit and a color checker card on every editorial shoot. Matching your strobe to ambient light on location takes under two minutes and saves hours in post-production color correction.
For an editorial photography gear guide, prioritize portability alongside quality. A Profoto B10X, a set of Westcott FJ400 strobes, and a Lastolite HiLite background cover most studio and location editorial scenarios without requiring a full grip truck.
4. How to prepare a shoot-day checklist that prevents failures
A detailed gear and shot checklist built the night before a shoot is the single most effective way to prevent costly on-set failures. Missing a trigger, a spare battery, or a key modifier does not just slow the shoot. It forces creative compromises that show up in the final images.
Your editorial photography checklist should cover three categories. First, camera and lens kit including bodies, lenses, batteries, and memory cards. Second, lighting equipment including strobes, modifiers, triggers, stands, and sandbags. Third, creative tools including the printed mood board, shot list, run-of-show schedule, and any props.
- Confirm call times and locations with every team member 24 hours before the shoot
- Print two copies of the shot list: one for yourself and one for the creative director or art director
- Pack a small emergency kit with gaffer tape, safety pins, a lint roller, and a portable steamer for wardrobe fixes
A run-of-show schedule that assigns time blocks to each shot or scene keeps the team moving and prevents the most common editorial shoot failure: running out of time before the most important frames are captured.
5. Mastering posing and directing models for authentic images
Editorial posing prioritizes visual interest and storytelling over symmetry or technical perfection. The goal is not a perfect pose. The goal is a frame that communicates something specific about the story.
The most effective technique for eliciting authentic expressions is the task prompt. Instead of saying “put your hand on your hip,” say “walk toward the window and stop when you feel the light on your face.” Giving models concrete tasks produces natural lines, genuine micro-expressions, and editorial-feeling frames that static pose commands never achieve. This approach works equally well with experienced models and first-time subjects.
- Vary gaze direction across the shot list: direct eye contact, off-camera gaze, and downward looks each communicate different emotional registers
- For group shots, create physical connections between subjects through overlapping arms, shared props, or staggered heights rather than side-by-side standing
- Use environmental elements like stairs, doorways, and furniture to control height differences and add compositional depth
Pro Tip: Tell your subject to “ignore you” for 30 seconds while you adjust your settings. The frames you capture during that window are almost always the strongest of the shoot.
6. How to curate an editorial portfolio that attracts clients
A portfolio of 15 to 30 images with consistent style and production value communicates professional quality more effectively than a gallery of 100 mixed images. Clients reviewing editorial portfolios make decisions in under 10 seconds. Cohesion is what stops the scroll.
Sequence your portfolio to create rhythm. Open with your single strongest image. Follow with variety in composition and subject, but maintain tonal and stylistic consistency throughout. End with an image that reinforces your signature visual identity. Portfolio cohesion matters more than quantity. Clients should grasp your visual identity immediately, not after scrolling through 40 images.
| Portfolio element | Why it matters |
|---|---|
| 15 to 30 curated images | Signals editorial discipline and quality control |
| Consistent color grading | Communicates a recognizable visual identity |
| Niche-specific selection | Targets the right clients in fashion, lifestyle, or outdoor editorial |
| Print portfolio option | Still expected by many magazine and agency art directors |
Tailor your portfolio to the clients you want. If you are targeting outdoor and adventure editorial clients, as Bissig does with brands and magazine editors in the adventure sports space, your portfolio should lead with dynamic environmental portraits and action-integrated editorial frames, not studio fashion work.
For more on building a client-winning presentation, the photography portfolio guide at Bissig covers sequencing and niche targeting in depth.
7. Common mistakes that undermine editorial photography work
The most damaging mistake in editorial photography is styling that contradicts the narrative. A wardrobe choice that feels off-brief, a location that fights the color palette, or a lighting setup that creates the wrong emotional register all signal a photographer who did not fully decode the brief. Styling, location, and lighting directly influence mood and storytelling impact, which means every visual element must serve the same story.
The second most common mistake is skipping the pre-shoot communication step. Photographers who arrive on set without a shared mood board or shot list spend the first hour of a shoot negotiating creative decisions that should have been resolved days earlier. That lost hour almost always comes from the most important scenes on the shot list.
“The best editorial images are made before the shoot starts. Every decision made in pre-production is a decision you do not have to make under pressure on set.”
Treat imperfections as creative assets rather than problems to fix. A wrinkled background, an unexpected shaft of light, or a model’s unscripted reaction can produce the most memorable frame of the day. The photographers who recognize these moments and capture them are the ones who build reputations for authentic editorial work.
Key takeaways
Strong editorial photography is built on preparation, intentional storytelling, and the discipline to keep every visual element aligned with the brief.
| Point | Details |
|---|---|
| Brief drives all decisions | Decode the editorial brief before making any technical or creative choices. |
| Mood boards unify teams | A structured mood board cuts on-set alignment time and prevents styling mismatches. |
| Task prompts beat pose commands | Giving models concrete actions produces authentic expressions and editorial-quality frames. |
| Portfolio cohesion wins clients | Curate 15 to 30 images with consistent style rather than showing every strong shot you own. |
| Checklists prevent shoot failures | A gear and shot checklist built the night before eliminates costly on-set compromises. |
What I’ve learned after years of editorial shoots in the field
The single biggest shift in my editorial work came when I stopped thinking about photography and started thinking about storytelling. Early in my career, I optimized for technically perfect frames. Sharp focus, clean exposure, balanced composition. Those images looked fine in a portfolio but felt flat in a magazine spread. They had no tension, no narrative pull.
The shift happened on a shoot in the Swiss Alps for an outdoor brand. The brief called for “raw mountain endurance.” I had the lighting dialed in, the model was positioned perfectly, and every frame was technically correct. Then the weather turned. Clouds rolled in, the light went flat, and the model started shivering. I kept shooting. Those frames, the ones with the gray sky, the visible cold, and the unscripted discomfort, were the ones the client used for the cover.
Preparation is what gave me the freedom to recognize that moment. Because the shot list was complete, the gear was ready, and the team was aligned, I had mental space to respond to what was actually happening rather than managing logistics. That is the real value of a thorough editorial photography process. It does not constrain creativity. It creates the conditions for it.
I also want to address the portfolio question directly. Photographers spend enormous energy capturing images and almost no energy curating them. Your portfolio is not a highlight reel. It is an argument. Every image should support the claim that you are the right photographer for a specific type of work. For outdoor and adventure editorial, that means showing environmental context, physical energy, and light that feels earned rather than manufactured.
— Martin
Take your editorial work further with Bissig
If you are building your editorial photography skills and want to see how professional outdoor and adventure storytelling translates to published work, Bissig’s portfolio offers a direct look at how preparation, lighting, and narrative intent combine in real editorial assignments.
From high-altitude mountain biking shoots in Pakistan to sun-driven lifestyle editorial in California, the work at Bissig’s outdoor photography demonstrates how the techniques covered in this article function at a professional level. For photographers looking to develop their outdoor editorial approach, the outdoor portrait ideas resource offers creative direction grounded in real location work. Whether you are refining your editorial process or building a portfolio for magazine clients, the resources at Bissig are built from the same workflows described here.
FAQ
What is editorial photography?
Editorial photography is the practice of creating narrative-driven images that support written content in magazines, newspapers, and digital publications. It prioritizes storytelling and emotional impact over direct product promotion.
How many images should an editorial portfolio contain?
A portfolio of 15 to 30 images with consistent style and production value is the standard recommendation. Cohesion matters more than quantity, and clients form impressions within seconds of viewing your work.
What lighting works best for editorial shoots?
The right lighting depends on the editorial brief. Natural window light suits lifestyle and intimate portrait work, while gelled strobes matched to ambient temperature produce cinematic editorial looks for fashion and concept-driven shoots.
How do you direct models for editorial photography?
Give models concrete tasks rather than fixed pose commands. Prompts like “walk toward the light and stop” produce authentic expressions and natural body lines that static instructions rarely achieve.
What should an editorial photography checklist include?
Your checklist should cover camera and lens kit, lighting equipment with modifiers and triggers, and creative tools including the printed mood board, shot list, and run-of-show schedule. Build it the night before every shoot.


