

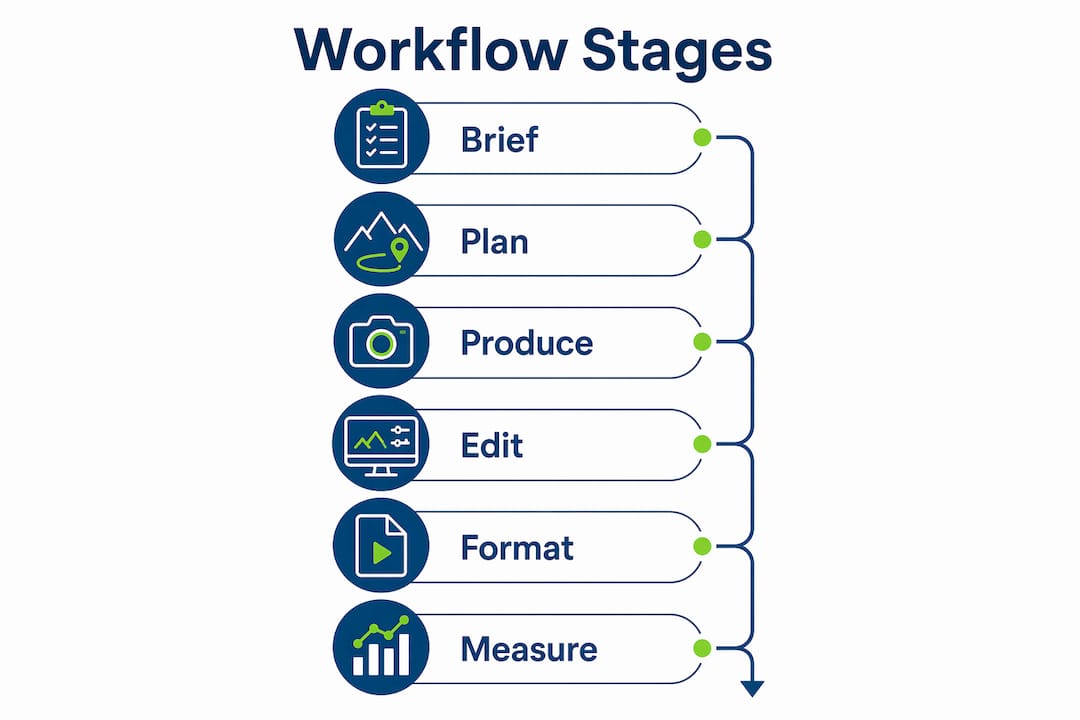
An effective outdoor brand visuals workflow is a structured six-stage process covering Brief, Plan, Produce, Edit & Approve, Format, and Measure & Repurpose, and it is the operating system that separates brands producing consistent, conversion-ready content from those constantly scrambling to fill content gaps. Tools like digital asset management (DAM) systems, tethered capture software, and batch editing platforms such as Adobe Lightroom sit at the core of this process. Brands like Decathlon have demonstrated what a disciplined brand imagery workflow actually delivers at scale. This article breaks down each stage with field-tested specifics so your creative team can execute faster, spend less on reshoots, and produce visuals that perform across every channel.
What tools and prerequisites does an outdoor brand visuals workflow require?
A functional outdoor brand visuals workflow starts with infrastructure, not inspiration. Before a single shutter fires, your team needs three categories of assets in place: tools, roles, and reference documents.
Core tools for the workflow
The right toolset determines how much friction exists between capture and delivery. A DAM system such as Cloudinary or Bynder handles metadata consistency and asset governance, which prevents the version-control chaos that kills team productivity. Tethered capture software connects the camera directly to a laptop so the art director reviews images live during the shoot. Batch editing tools like Adobe Lightroom or Photoroom apply standardized presets across hundreds of images in minutes rather than hours.

| Tool | Primary function in workflow |
|---|---|
| DAM system (Cloudinary, Bynder) | Asset storage, tagging, version control, delivery |
| Tethered capture software | Live preview during shoots, faster approvals |
| Adobe Lightroom / Photoroom | Preset-based batch editing, color consistency |
| Shot list template | Scene organization, throughput planning |
| Brand guidelines document | Logo, color, typography, overlay rules |
Roles that keep production moving
Four roles define a clean workflow: photographer, art director or client representative, editor, and approver. Separating these roles prevents the single biggest production-day failure, which is one person trying to shoot and review simultaneously. The approver must be named in the brief before the shoot date. Ambiguity about who has final sign-off creates revision loops that can double post-production time.
Pro Tip: Lock your brand guidelines document, including approved color palettes, logo safe zones, and permitted text overlays, before the shoot brief is written. Retroactive brand corrections in post-production cost three to five times more than catching them upfront.
Preparatory reference documents include mood boards, approved shot lists, and a packshot rules sheet. These are not optional. They are the shared language between your creative team and any external photographers or videographers you bring in for a campaign.
How do you plan and execute outdoor shoots for maximum efficiency?
Systematic shoot planning is the difference between a production day that yields 200 usable assets and one that yields 40. The shot list matrix organizes every required image by scene category rather than by individual product, and this single structural decision transforms throughput.
Building a shot list matrix
A shot list matrix groups images into scene categories: lifestyle in-use, product-in-hand, and environmental context. For each product, you capture four image types: hero, scale, detail, and lifestyle. Organizing the shoot day by scene category rather than cycling through every product for every shot type reduces cognitive switching and keeps lighting setups consistent across a full batch. This approach also makes it far easier to hand off to an editor who can batch-process all images from one scene category at once.
Here is a practical execution sequence for an outdoor product shoot:
- Identify your scene categories before the shoot day. Typical outdoor categories include trail use, summit or peak environment, water or river context, and studio-clean packshot.
- Assign products to categories based on campaign needs. A hiking boot might need trail use and summit shots; a hydration pack needs trail use and product-in-hand.
- Schedule golden light windows first. Outdoor lighting strategy requires capturing must-have angles early, before natural light shifts create shadow and color problems that force reshoots. Schedule your hero and lifestyle shots within the first two hours of available light.
- Batch all products within one scene category before moving to the next setup. Shoot every product that needs a trail-use lifestyle shot before breaking down that location and moving to the packshot setup.
- Use tethered capture throughout. Tethered capture with live preview keeps the art director reviewing images in real time while the photographer stays focused on shooting. This eliminates the end-of-day review surprise where a key angle is missing or a label is obscured.
- Capture clean and lifestyle versions of each product. Clean packshots build shopper confidence while lifestyle images build brand authenticity. Both are required for a complete asset set.
Pro Tip: Shoot your most critical angles during the first 90 minutes of golden light. If a cloud bank rolls in or wind picks up, you will have your non-negotiable hero shots already captured. Secondary and detail shots can tolerate more variable conditions.
Batching products by family, for example all waterproof jackets together before moving to footwear, also maintains lighting consistency across the product line. This matters enormously when a retailer or e-commerce platform displays multiple products side by side.
What editing and approval practices cut production time without sacrificing quality?
The editing stage is where most outdoor brand visual workflows lose time to ambiguity. Subjective interpretation in editing, where one editor chooses a warm tone and another chooses neutral, destroys brand consistency and triggers revision cycles. The fix is preset-driven editing combined with a single, named approver.
Decathlon’s results make the business case clearly. By applying approximately 100 standardized presets and batch processing 250 images at a time integrated with their DAM, Decathlon reduced editing costs by 99% and delivered market rollouts four times faster. That is not a marginal efficiency gain. It means a team that previously spent weeks on post-production now completes the same volume in days.
Approval and version control practices
- Name one approver per project in the brief. Multiple approvers with equal authority produce contradictory feedback and stall delivery.
- Define a brand rule checklist upfront. This checklist specifies approved text styles, logo placement zones, permitted color overlays, and any restricted imagery. Editors work against this checklist, not against personal judgment.
- Use your DAM for version control. Governed metadata and taxonomy with a single accountable owner prevents labeling fragmentation and ensures the correct version reaches the correct channel.
- Automate where possible. Workflow automation with controlled versioning reduces manual handoffs and the approval bottlenecks that come with them.
- Tag assets at the editing stage, not after delivery. Retroactive tagging is the leading cause of DAM disorder in growing brand teams.
Pro Tip: Create a “packshot rules” one-pager that specifies background color values, shadow treatment, crop margins, and color profile. Give this to every editor and every external retoucher before they open a single file. Most efficiency gains come from removing editing ambiguity rather than from faster hardware.
Scaling product photography also benefits from defining asset tiers. Foundation assets are clean packshots for retail and e-commerce. Lifestyle assets are campaign-grade imagery for social and advertising. Reactive assets are fast-turnaround content for timely posts or promotions. Defining these tiers clarifies which editing standard applies to each image type and prevents over-engineering packshots or under-delivering campaign assets.
How do you format, deliver, and measure outdoor brand visuals across platforms?
Formatting is the stage most teams treat as an afterthought. It should be planned in the brief. Platform-specific crops and naming conventions decided at the brief stage prevent the costly discovery that your hero image does not fit an Instagram Stories frame or that your Amazon product page requires a different aspect ratio than your campaign banner.
Platform formatting and channel tagging
- Plan aspect ratios for every intended placement during the brief: 1:1 for Instagram feed, 9:16 for Stories and Reels, 16:9 for YouTube and display advertising, and 4:5 for Amazon product pages.
- Use systematic naming conventions that embed channel information directly in the file name. A file named "brand_product_trail-lifestyle_9x16_IG-stories_v1.jpg` is self-describing and prevents mismatches.
- Leverage your DAM to automate crop and format variations with governance rules. This removes the manual step of resizing each asset individually for each platform.
| Platform | Aspect ratio | Primary use |
|---|---|---|
| Instagram feed | 1:1 or 4:5 | Brand awareness, product launch |
| Instagram Stories / Reels | 9:16 | Campaign, UGC-style content |
| Amazon product page | 1:1 (white background) | E-commerce conversion |
| YouTube / display ads | 16:9 | Video, banner advertising |
| 2:3 | Discovery, lifestyle content |
Measuring performance and repurposing assets
Collect engagement metrics per asset, not per campaign. Knowing that a specific trail-use lifestyle shot of a hydration pack drove three times the click-through rate of the packshot version tells you exactly what to brief more of in the next shoot. Upstream alignment on goals and CTA in the brief stage makes this measurement meaningful because you have a defined benchmark to measure against. High-performing assets should be repurposed systematically: adapt them for seasonal campaigns, resize for new platforms, or use them as reference benchmarks in future mood boards.
Key takeaways
A repeatable outdoor brand visuals workflow requires upfront alignment, preset-driven editing, and DAM-governed delivery to produce consistent, platform-ready content at scale.
| Point | Details |
|---|---|
| Lock the brief first | Define goals, audience, CTA, and approver before any shoot planning begins. |
| Organize shoots by scene category | Batch all products within one scene type before moving to the next setup to maintain lighting consistency. |
| Use preset-based batch editing | Standardized presets eliminate subjective editing and can reduce post-production time by over 99%. |
| Name one approver per project | A single, named approver prevents contradictory feedback and stalled delivery cycles. |
| Plan formats in the brief | Specify platform aspect ratios and naming conventions before the shoot to avoid costly reshoots. |
Why the brief is the most underrated part of the entire process
Most workflow problems I see with outdoor brand teams are not production problems. They are brief problems that show up late. A shoot that starts without a locked approver, a defined CTA, or a clear tone reference will generate beautiful images that nobody can agree on, and the revision cycle that follows costs more than the shoot itself.
Batching by scene category rather than by product is the single change that most immediately improves both quality and throughput on a production day. When you stay in one lighting setup and one creative context for a full batch, your eye calibrates. You catch the subtle label rotation or the shadow creeping into the frame because you are not constantly resetting your mental reference point. I have seen teams cut their production day from ten hours to six simply by restructuring their shot list this way.
On the question of original photography versus AI-assisted or template-based content: both have a place, but they serve different asset tiers. Foundation packshots and reactive social content are strong candidates for AI-assisted generation or mockup tools. Campaign-grade outdoor advertising visuals that need to carry emotional weight and brand authenticity require original photography in real environments. Conflating these two tiers is where brands waste budget, either over-investing in AI tools for hero content or under-investing in real photography for conversion-critical assets.
Metadata governance is the unglamorous discipline that determines whether your DAM is an asset or a liability at 18 months. Assign one person ownership of the taxonomy. That person approves every new tag, every new folder structure, and every naming convention change. Without that ownership, you will have five different spellings of “trail running” in your DAM within a year, and your team will spend more time searching for assets than using them.
— Martin
Work with Bissig to produce visuals that perform
Bissig specializes in action and outdoor photography and filmmaking for commercial and editorial clients across adventure sports, travel, and mountain environments. If your team needs campaign-grade imagery that holds up in every format from Instagram Stories to full-page print, working with a specialist who understands both the creative and the technical demands of outdoor production makes a measurable difference. Explore Bissig’s action photography techniques for a detailed look at how dynamic outdoor campaigns come together, or review the filmmaking for outdoor brands guide to see how video fits into a complete visual content strategy.
FAQ
What are the six stages of an outdoor brand visuals workflow?
The six stages are Brief, Plan, Produce, Edit & Approve, Format, and Measure & Repurpose. Each stage builds on the previous one, and skipping the brief stage is the most common cause of expensive revisions later.
How does tethered capture improve outdoor shoot efficiency?
Tethered capture connects the camera to a laptop so the art director reviews images live during the shoot. This separates the photographer and reviewer roles and eliminates end-of-day surprises where critical angles are missing.
Why should you organize a shoot by scene category instead of by product?
Organizing by scene category keeps lighting setups consistent across a full batch and reduces the cognitive load of constantly resetting creative context. This approach directly improves throughput and makes batch editing far faster in post-production.
What is the fastest way to reduce editing time for outdoor brand visuals?
Standardized presets applied through batch editing tools like Adobe Lightroom or Photoroom are the fastest path to consistent, fast post-production. Decathlon reduced editing costs by 99% using this approach across 1,000 images.
How do you prevent asset mismatches across marketing platforms?
Plan platform-specific aspect ratios and naming conventions during the brief stage, not after delivery. Channel tagging and format planning at the start of the workflow prevents the mismatch between a hero image and an Instagram Stories or Amazon product page frame.


